دستور ZOOM
با استفاده از دستور ZOOM در اتوکد می توان بر روی هر ناحیه از فضای ترسیم در اتوکد بزرگنمایی کرد. با استفاده از تایپ شرت کد (Shortcut Key) Z در خط فرمان و زدن اینتر این فرمان فعال می گردد. و یا از طریق منوبار در زبانه View گزینه ZOOM.
البته با استفاده از چرخاندن غلطک وسط موس رو به جلو و رو به عقب می توان به راحتی زوم این (Zoom in) و زوم اوت (Zoom out) کرد.
برای زوم کردن بر روی موقعیت های مختلف از فضای ترسیم اتوکد روش های مختلفی وجود دارد، که هر یک از آن ها در مقعیت خاصی به کمک ما می آیند. در زیر به هر یک از آنها اشاره شده است.
[All/Center/Dynamic/Extents/Previous/Scale/Window/Object]
بعد از اجرای فرمان زوم (تایپ حرف Z و زدن اینتر) کلمات بالا ظاهر می گردند، با تایپ حرف ابتدای هر یک از فرامین بالا و زدن اینتر آن فرمان اجرا می گردد (و یا بر روی هر یک از کلمات کلیک کنید).
All: این دستور بر روی تمام موضوعات موجود در فضای ترسیم زوم می کند.
نکته: برای زوم کردن بر روی تمام اشیاء نیاز به استفاده از دستور زوم نیست. و در هر کجا از فضای ترسیم که باشید فقط کافی است دوبار پشت سرهم و سریع بر روی قلطک موس کلیک کنید.
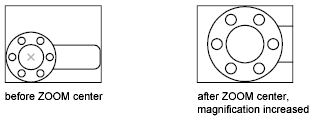
Center: نقطه مرکز ناحیه زوم را انتخاب کنید سپس ارتفاع ناحیه را بدهید.
Dynamic: به صورت دینامیک می توان محدوده زوم را انتخاب نمود.
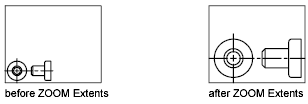
Extents: همان زوم All است.
Previous: به ناحیه زوم شده قبلی باز می گردد.
Scale: روی همان ناحیه از فضای ترسیم که هستید با یک اسکیل فاکتور زوم می کند.
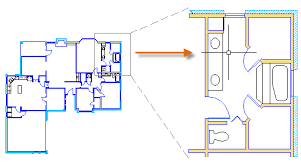
Window: بعد از اجرای این دستور ناحیه ای که قرار است زوم کنید را مشخص می کنید.
Object: بعد از اجرای این دستور بر روی هر شیئ که کلیک کنید زوم می کند.
Increases or decreases the magnification of the view in the current viewport.
You can change the magnification of a view by zooming in and out, which is similar
to zooming in and out with a camera. Using ZOOM does not change the absolute size
of objects in the drawing. It changes only the magnification of the view.
In a perspective view, ZOOM displays the 3DZOOM prompts.
The following prompts are displayed.
Specify one corner of the area to be zoomed into.
Zooms to display all visible objects and visual aids.
Adjusts the magnification of the drawing area to accommodate the extents of all visible
objects in the drawing, or visual aids such as the grid limits (the LIMITS command),
whichever is larger.

In the illustration on the right, the grid limits are set to a larger area than the
extents of the drawing.
Because it always regenerates the drawing, you cannot use ZOOM All transparently.
Zooms to display a view defined by a center point and a magnification value or a height.
A smaller value for the height increases the magnification. A larger value decreases
the magnification. Not available in perspective projection.
Pans and zooms using a rectangular view box. The view box represents your view, which
you can shrink or enlarge and move around the drawing. Positioning and sizing the
view box pans or zooms to fill the viewport with the view inside the view box. Not
available in perspective projection.

Zooms to display the maximum extents of all objects.
The extents of each object in the model are calculated and used to determine how the
model should fill the window.
Zooms to display the previous view. You can restore up to 10 previous views.

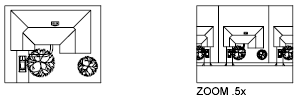
Zooms to change the magnification of a view using a scale factor.
For example, entering .۵x causes each object to be displayed at half its current size on the screen.
Entering .۵xp displays model space at half the scale of paper space units. You can create a layout
with each viewport displaying objects at a different scale.
Enter a value to specify the scale relative to the grid limits of the drawing. (This
option is rarely used.) For example, entering ۲ displays objects at twice the size they would appear if you were zoomed to the limits
of the drawing.

Zooms to display an area specified by a rectangular window.
With the cursor, you can define an area of the model to fill the entire window.

Zooms to display one or more selected objects as large as possible and in the center
of the view. You can select objects before or after you start the ZOOM command.
Zooms interactively to change the magnification of the view.
The cursor changes to a magnifying glass with plus (+) and minus (-) signs. See Zoom
Shortcut Menu for a description of the options that are available while zooming in
real time.

Holding down the pick button at the midpoint of the window and moving vertically to
the top of the window zooms in to 100%. Conversely, holding the pick button down at
the midpoint of the window and moving vertically to the bottom of the window zooms
out by 100%.
When you reach the zoom-in limit, the plus sign in the cursor disappears, indicating
that you can no longer zoom in. When you reach the zoom-out limit, the minus sign
in the cursor disappears, indicating that you can no longer zoom out.
When you release the pick button, zooming stops. You can release the pick button,
move the cursor to another location in the drawing, and then press the pick button
again and continue to zoom the display from that location.
To exit zooming, press Enter or Esc.