دستور VIEWSECTION در اتوکد

مشاهده (فرمان)

نمای بخش از یک مدل سه بعدی را ایجاد می کند که در اتوکد یا Autodesk Inventor ایجاد شده است.

علامت

اگر Infer Constraints روشن باشد ، خط مقطع محدودیت بر هندسه نمای والدین بر اساس نقاط ضربه محکم و ناگهانی شی محدود می شود. اگر محدودیت های Infer خاموش باشد ، خط بخش به هندسه نمای والدین محدود نمی شود. با این وجود ، می توانید بعد از ایجاد بخش ، محدودیت ها را به صورت دستی اضافه کنید.

پس از مشخص شدن خط مقطع ، پیش نمایش بخش به نشانگر ، به همراه شناسه برچسب حروف الفبا ، به مکان نما وصل می شود . به طور پیش فرض ،
پیش نمایش نمای بخش بسته به موقعیت مکانیک نسبت به نمای والدین و خط مقطع ، با قسمت اول یا آخرین بخش خط مطابقت دارد.

خط نشانه تراز از مرکز نمای والدین و عمود بر خط بخش نمایش داده می شود. برای شکستن تراز ، Shift را فشار دهید.

این برنامه همیشه برچسب بخش آزاد بعدی را تعیین می کند. برچسب های I ، O ، Q ، S ، X و Z به طور پیش فرض از این امر مستثنی هستند ، اما می توان آنها را به صورت دستی رونویسی کرد. می توانید حروف الفبا را مشخص کنید که در کادر گفتگوی بخش بخش نمایش سبک مدیر حذف نمی شوند.

با اجرای این دستور پیام های زیر نمایش داده می شود.

نمای والدین را انتخاب کنید

نمای جزئیات بخش را مشخص می کند.

نقطه شروع

نقطه شروع را برای خط بخش مشخص می کند.

نکته بعدی
نکته بعدی را برای خط بخش مشخص می کند.

تایپ کنید

نوع نمای بخش. گزینه هایی که می توانید مشاهده کنید به نوع انتخابی شما بستگی دارد.

پر شده

از نمای کامل برای بخش بندی استفاده می کند.

  • نقطه شروع اولین نقطه از خط بخش را مشخص می کند.
  • نقطه پایان نکته دوم خط بخش را مشخص می کند.
  • واگرد نقطه پایان انتخاب شده را پاک می کند.
  • محل. قرار دادن نمای بخش را مشخص می کند.
نیم
نیمی از نمای را برای بخش بندی مشخص می کند. پس از مشخص شدن نقطه انتهایی خط مقطع ، پیش نمایش بخش به نشانگر وصل می شود ، به همراه شناسه برچسب حروف الفبا .

  • نقطه شروع اولین نقطه از خط بخش را مشخص می کند.
  • نکته بعدی نکته بعدی خط بخش را مشخص می کند.
  • واگرد آخرین نقطه انتخاب شده را پاک می کند.
  • نقطه پایان آخرین نقطه از خط بخش را مشخص می کند.
  • محل. قرار دادن نمای بخش را مشخص می کند.
انحراف
مشخص می کند که افست مشخص شده توسط بخش برای برش مدل استفاده می شود. از شما خواسته می شود تا نکته بعدی را انتخاب کنید تا انتخاب کنید. پس از انتخاب Done ، پیش نمایش نمای بخش به مکان نما به همراه شناسه برچسب بخش حروف الفبا وصل می شود .

  • نقطه شروع اولین نقطه از خط بخش را مشخص می کند.
  • نکته بعدی نکته بعدی خط بخش را مشخص می کند.
  • واگرد آخرین نقطه انتخاب شده را پاک می کند.
  • انجام شده. آخرین نقطه از خط بخش را مشخص می کند.
  • محل. قرار دادن نمای بخش را مشخص می کند.
هم راستا
نمای بخش را مشخص می کند که همیشه عمود بر خط اول یا آخرین بخش است . بعد از اولین نکته ، تا زمانی که انتخاب کنید انجام شود ، برای نکته بعدی از شما خواسته می شود . پس از انتخاب Done ، پیش نمایش نمای بخش به مکان نما به همراه شناسه برچسب بخش حروف الفبا وصل می شود.

  • نقطه شروع اولین نقطه از خط بخش را مشخص می کند.
  • نکته بعدی نکته بعدی خط بخش را مشخص می کند.
  • واگرد آخرین نقطه انتخاب شده را پاک می کند.
  • انجام شده. آخرین نقطه از خط بخش را مشخص می کند.
  • محل. قرار دادن نمای بخش را مشخص می کند.
هدف – شی
هندسه موجود را در یک نمای مشخص می کند که به عنوان خط مقطع مورد استفاده قرار گیرد. پس از انتخاب هندسه موجود و نمای بخش ایجاد می شود ، هندسه انتخاب شده حذف می شود. خط مقطع ایجاد شده از هندسه مربوط به نمای والدین است اما محدود به هندسه نمای نیست.

  • اشیاء را انتخاب کنید. هندسه مورد استفاده به عنوان خط مقطع را مشخص می کند.
  • انجام شده. آخرین نقطه از خط بخش را مشخص می کند.

خروج
بدون انتخاب نوع بخش ، به قسمت قبلی باز می گردد.

نمایندگی

این پانل فقط زمانی قابل مشاهده است که شما یک بخش از مدل Inventor ایجاد کرده اید. هنگام ایجاد نمای بخش ، فقط می توانید مقادیر مربوط به Design View را ویرایش کنید.

خطوط پنهان

گزینه های نمایش را برای نمای بخش مشخص می کند.
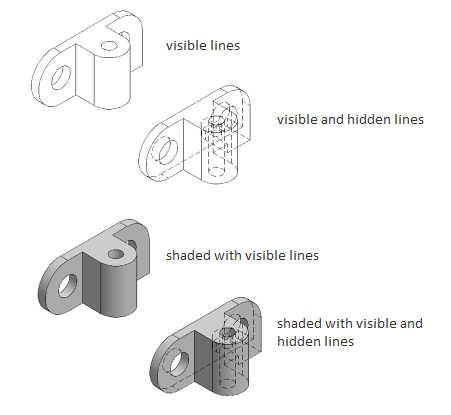
خطوط قابل مشاهده
نمای بخش را در قاب سیم با نمایش فقط خطوط قابل مشاهده نمایش می دهد.
خطوط قابل مشاهده و پنهان
نمایش بخش در wireframe را با نمایش خطوط قابل مشاهده و پنهان نشان می دهد.
سایه بان با خطوط قابل مشاهده
نمای بخش را به صورت سایه دار نشان می دهد و فقط خطوط قابل مشاهده دارند.
سایه بان با خطوط قابل مشاهده و پنهان
نمای بخش را به صورت سایه دار نشان می دهد ، با خطوط قابل مشاهده و پنهان.
از پدر و مادر
نمای بخش را با خاصیتی که از پایه والدین یا نمای پیش بینی شده به ارث برده است ، نشان می دهد.

مقیاس

مقیاس نمای بخش را مشخص می کند. به طور پیش فرض ، مقیاس نمای والدین به ارث می رسد.

مقیاس را وارد کنید
مقیاس را برای نمای بخش مشخص کنید.
از پدر و مادر
همان مقیاس نمایش والدین را مشخص کنید. این رفتار به طور پیش فرض است.

دید

گزینه های دید را برای تنظیم قسمت نمای مشخص کنید. گزینه های قابلیت مشاهده شیء مدل خاص هستند و ممکن است برخی از گزینه ها در مدل انتخابی در دسترس نباشند.

لبه های تداخل

لبه های تداخل را روشن یا خاموش می کند. لبه تداخل هنگامی رخ می دهد که چهره های چندین مؤلفه از هم جدا شوند. هنگامی که لبه های تداخل روشن هستند ، لبه ای نمایش داده می شود که محل اجزای آنها در کجا ملاقات می کند.
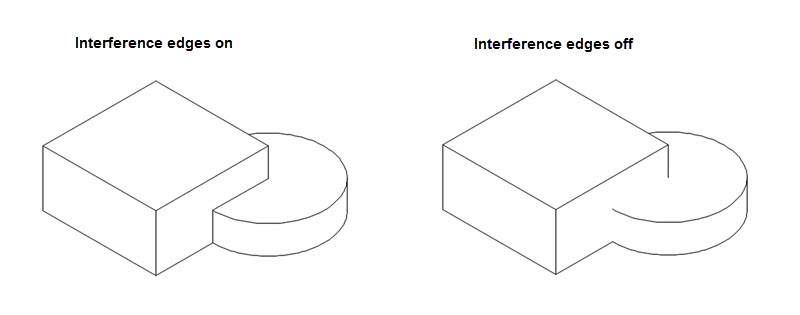
لبه تداخل هنگامی رخ می دهد که چهره های چندین مؤلفه از هم جدا شوند. هنگامی که لبه های تداخل روشن هستند ، لبه ای نمایش داده می شود که محل اجزای آنها در کجا ملاقات می کند.

لبه های مماس

لبه های مماس را روشن یا خاموش می کند. لبه های مماس انتقال بین یک سطح صاف و یک لبه گرد را نشان می دهد ، که معمولاً به عنوان لبه های پر شده مشاهده می شود.

  • لبه های مماس پیش بینی شده است. طول لبه های مماس را کوتاه می کند تا آنها را از لبه های قابل مشاهده متمایز کند. این تنها در صورت انتخاب Tangent Edges در دسترس است.
خم زیاد

خطوط میزان خم ورق فلز را روشن یا خاموش می کند. خطوط اندازه خم فلزی نشانگر موقعیت گذار که در آن یک خم لولا یا چین خورده است ، در یک
نمای فلز مسطح شده است.

این گزینه فقط در صورتی موجود است که مدل مربوطه دارای یک صفحه فلزی مسطح باشد که در آن مشخص شده است.

ویژگی های موضوع

قابلیت دید خطوط نخ را در پیچ ها و سوراخ های ضبط شده را روشن یا خاموش می کند.

مسیرهای ارائه

قابلیت مشاهده مسیرهای ارائه را روشن یا خاموش می کند. مسیرهای ارائه خطوط در نمای منفجر شده (در یک فایل ارائه) هستند که مسیری را نشان می دهند که در طی آن اجزاء به موقعیت مونتاژ منتقل می شوند.

حاشیه نویسی

شناسایی کنید
برچسب مربوط به خط بخش و نمای بخش نتیجه را مشخص می کند.برنامه همیشه از طراحی ، برچسب بخش رایگان بعدی تعیین می کند. برچسب های I ، O ، Q ، S ، X و Z به طور پیش فرض از این امر مستثنی هستند ، اما می توان آنها را به صورت دستی رونویسی کرد.
می توانید حروف الفبا را مشخص کنید که در کادر گفتگوی بخش بخش نمایش سبک مدیر حذف نمی شوند .
برچسب

مشخص می کند که متن برچسب نمای بخش نمایش داده می شود یا خیر.

دریچه

مشخص می کند که آیا دریچه ای در نمای بخش نمایش داده شده است یا خیر.

خروج

به قسمت قبلی باز می گردد ، یا بسته به مکانی که در چرخه فرمان باشد گزینه ظاهر می شود ، فرمان را تکمیل می کند.

VIEWSECTION (Command)

Creates a section view of a 3D model that was created in AutoCAD or in Autodesk Inventor.

Find

If Infer Constraints is turned on, the section line is constrained to the parent
view geometry based on the object snap points. If Infer Constraints is turned off,
the section line is not constrained to the parent view geometry. However, you can
add constraints manually after you create the section view.

Once the section line is specified, the section preview is attached to the cursor,
along with the alphabetical section label identifier. By default, the section view’s
preview is aligned to either the first or last segment of the section line depending
on the cursor location relative to the parent view and section line.

An alignment indication line from the center of the parent view and perpendicular
to the section line is displayed. Press Shift to break the alignment.

The program always determines the next free section label. Labels I, O, Q, S, X,
and Z are excluded by default, however these can be manually overwritten. You can
specify the alphabets to be excluded in the Section View Style Manager dialog box.

The following prompts are displayed.

Select parent view

Specifies a view for the section detail.

Start point

Specifies a start point for the section line.

Next point
Specifies the next point for the section line.

Type

The type of section view. The options you can view depend on the type you choose.

Full

Uses the complete view for sectioning.

  • Start point. Specifies the first point of the section line.
  • End Point. Specifies the second point of the section line.
  • Undo. Clears the selected end point.
  • Location. Specifies the placement of the section view.
Half
Specifies half of the view is used for sectioning. Once the end point of the section
line is specified, the section preview is attached to the cursor, along with the alphabetical
section label identifier.

  • Start point. Specifies the first point of the section line.
  • Next Point. Specifies the next point of the section line.
  • Undo. Clears the last selected point.
  • End Point. Specifies the last point of the section line.
  • Location. Specifies the placement of the section view.
Offset
Specifies that the offset specified by the section is used for cutting the model.
You are prompted for the next point until you select Done. Once you select Done, the
section view preview is attached to the cursor, along with the alphabetical section
label identifier.

  • Start point. Specifies the first point of the section line.
  • Next Point. Specifies the next point of the section line.
  • Undo. Clears the last selected point.
  • Done. Specifies the last point of the section line.
  • Location. Specifies the placement of the section view.
Aligned
Specifies the section view is always aligned perpendicular to the first or last section
line. After the first point, you are prompted for the next point until you select
Done. Once you select Done, the section view preview is attached to the cursor, along
with the alphabetical section label identifier.

  • Start point. Specifies the first point of the section line.
  • Next Point. Specifies the next point of the section line.
  • Undo. Clears the last selected point.
  • Done. Specifies the last point of the section line.
  • Location. Specifies the placement of the section view.
Object
Specifies an existing geometry within a view to be used as a section line. Once the
existing geometry is selected and the section view is created, the selected geometry
is deleted. The section line created from the geometry is associated to the parent
view but it is not constrained to the view geometry.

  • Select objects. Specifies the geometry used as the section line.
  • Done. Specifies the last point of the section line.

Exit
Returns to the previous prompt without selecting a section type.

Representation

This panel is visible only when you have created a section view from an Inventor model.
When creating section views, you can only edit the values for Design View.

Hidden Lines

Specifies the display options for the section view.

Visible Lines
Displays the section view in wireframe with only visible lines showing.
Visible and Hidden Lines

Displays the section view in wireframe with both the visible and hidden lines showing.

Shaded with Visible Lines
Displays the section view as shaded, with only visible lines showing.
Shaded with Visible and Hidden Lines
Displays the section view as shaded, with both visible and hidden lines showing.
From Parent
Displays the section view with the property has inherited from the parent base or
projected view.

Scale

Specifies the scale of the section view. By default, the scale of the parent view
is inherited.

Enter scale
Specify the scale for the section view.
From Parent
Specify the same scale as the parent view. This is the default behavior.

Visibility

Specify the visibility options to set for the section view. Object visibility options
are model specific and some options may not be available in the selected model.

Interference edges

Turns visibility of interference edges on or off. An interference edge occurs when
faces of multiple components intersect. When Interference Edges are turned on, an
edge is displayed that shows where the components meet.

An interference edge occurs when faces of multiple components intersect. When Interference
Edges are turned on, an edge is displayed that shows where the components meet.

Tangent edges

Turns visibility of tangent edges on or off. Tangent edges mark the transition between
a flat surface and a rounded edge, most commonly seen as filleted edges.

  • Tangent edges foreshortened. Shortens the length of tangential edges to differentiate them from visible edges.
    This is available only if Tangent Edges is selected.
Bend extents

Turns visibility of sheet metal bend extent lines on or off. Sheet metal bend extent
lines indicate the location of transition about which a bend hinges or folds, in a
flattened sheet metal view.

This option is available only if the corresponding model has a flattened sheet metal
view defined in it.

Thread features

Turns visibility of thread lines on screws and tapped holes on or off.

Presentation trails

Turns visibility of presentation trails on or off. Presentation trails are lines in
an exploded view (in a presentation file) that show the direction along which a components
are moved into assembled position.

Annotation

Identifier

Specifies the label for the section line and the resulting section view.

The program always determines from the drawing, the next free section label. Labels
I, O, Q, S, X, and Z are excluded by default, however these can be manually overwritten.
You can specify the alphabets to be excluded in the Section View Style Manager dialog
box.

Label

Specifies if the section view label text is displayed or not.

Hatch

Specifies whether or not hatch is displayed in the section view.

Exit

Goes back to the previous prompt, or completes the command, depending on where in
the command cycle the option appears.

Learning AutoCad

درباره نویسنده


بنده سیامک دوستداری فارغ التحصیل رشته مکانیک سنگ از دانشگاه صنعتی اصفهان هستم، و در این وبسایت آموزش های مربوط به نحوه برنامه نویسی در اتوکد و هچنین آموزش تصویری دستورات اتوکد را قرار خواهم داد.

تلفن همراه: ۰۹۰۰۱۲۳۴۴۴۴

ایمیل: s.doostdari@gmail.com

ترفند های اتوکد


نظرات کاربران


دیدگاهتان را بنویسید

نشانی ایمیل شما منتشر نخواهد شد. بخش‌های موردنیاز علامت‌گذاری شده‌اند *