یک منحنی صاف ایجاد می کند که از طریق آن و یا در نزدیکی مجموعه ای از نقاط مناسب عبور کند ، یا آن را توسط رئوس در یک قاب کنترل تعریف می کند.
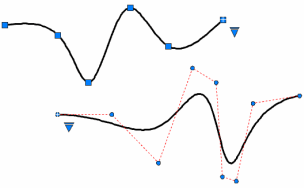
SPLINE منحنی هایی به نام B-splines های منطقی غیر یکنواخت (NURBS) ایجاد می کند ، که برای سادگی به آنها خطوطی گفته می شود . هواپیماها با نقاط مناسب یا با نقاط کنترل تعریف می شوند. به طور پیش فرض ، نقاط متناسب با spline همزمان می شوند ، در حالی که رئوس های کنترل یک قاب کنترل را تعیین می کنند . فریم های کنترلی یک روش مناسب برای شکل دادن به اسپلین ارائه می دهند. هر روش مزایای خود را دارد.

برای نمایش یا پنهان کردن مهره های کنترل و کادر کنترل ، اسپل را انتخاب یا لغو انتخاب کنید یا از CVSHOW و CVHIDE استفاده کنید. اما ، برای اسپلین های ایجاد شده با رأس های کنترلی در اتوکد LT ، می توانید فقط با انتخاب اسپلین ، قاب کنترل را نشان دهید. بسته به اینکه آیا Fit یا CV (رأس های کنترل) را به عنوان روش ایجاد انتخاب می کنید ، گزینه ها متفاوت هستند (گزینه Method).
بسته به روش فعلی ، نقطه اول اسپلن ، یا اولین نقطه مناسب یا اولین راس کنترل را مشخص می کند.
تا زمانی که Enter را فشار دهید ، بخش های اضافی spline ایجاد می کند.

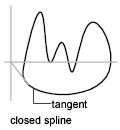
با تعریف آخرین نکته ، خط اسپاین را می بندد تا همزمان با اولین باشد. به طور پیش فرض ، اسپلین های بسته دوره ای هستند و تداوم انحنای (C2) را در کل حلقه حفظ می کنند.

کنترل می کند که آیا اسپلین با نقاط مناسب یا با رأس های کنترل ایجاد شده است. (متغیر سیستم SPLMETHOD )
با مشخص کردن نقاط مناسب که اسپلین باید از آن عبور کند ، یک درجه ۳ (مکعب) B-spline ایجاد می کند . هنگامی که مقدار تحمل از ۰ بیشتر باشد ، اسپلین باید در فاصله تحمل مشخص شده از هر نقطه باشد.
با مشخص کردن رئوسهای کنترل ، یک اسپلین ایجاد می کند. با استفاده از این روش برای ایجاد خط نقطه گذرهای درجه دوم حداقل از درجه ۱ (خطی)، درجه ۲ (درجه دوم)، درجه ۳ (مکعب)، و به همین ترتیب تا درجه ۱۰. تنظیم به شکل یک نوار باریک با حرکت راس کنترل اغلب فراهم می کند بهتر نتایج از حرکت مناسب نکته ها.
پلی اتیلن های دو بعدی یا سه بعدی مربع یا اسپلیت متناسب با اسپلین های معادل را تبدیل می کند. بسته بندی اصلی بسته به تنظیم متغیر سیستم DELOBJ ، پلی لاین اصلی حفظ یا دور می شود.
دستورالعمل های زیر مربوط به روش fit fit است.
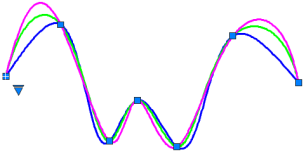
پارامتر کردن گره را مشخص می کند ، یکی از چندین روش محاسباتی که تعیین می کند چگونه منحنی جزء بین نقاط متناسب پی در پی در یک اسپاین مخلوط می شود. (متغیر سیستم SPLKNOTS)

شرط مماس را در نقطه شروع اسپلین مشخص می کند.

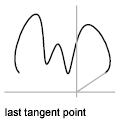
شرط مماس را در نقطه انتهایی طحال مشخص می کند.

فاصله ای که اسپلین اجازه انحراف از نقاط مناسب را داشته باشد را مشخص می کند . مقدار تحمل ۰ نیاز به این دارد که اسپلین حاصل به طور مستقیم از نقاط مناسب عبور کند. مقدار تحمل در مورد تمام نقاط مناسب به جز نقاط مناسب شروع و پایان ، که همیشه تحمل ۰ دارند ، اعمال می شود.

Creates a smooth curve that passes through or near a set of fit points, or that is
defined by the vertices in a control frame.
SPLINE creates curves called nonuniform rational B-splines (NURBS), referred to as splines for simplicity.
Splines are defined either with fit points, or with control vertices. By default,
fit points coincide with the spline, while control vertices define a control frame. Control frames provide a convenient method to shape the spline. Each method has
its advantages.

To display or hide the control vertices and control frame, select or deselect the
spline, or use CVSHOW and CVHIDE. However, for splines created with control vertices
in AutoCAD LT, you can display the control frame only by selecting the spline.
The prompts differ, depending on whether you choose Fit or CV (control vertices) as
the creation method (Method option).
Specifies the first point of the spline, either the first fit point or the first control
vertex, depending on the current method.
Creates additional spline segments until you press Enter.

Closes the spline by defining the last point to be coincident with the first. By default,
closed splines are periodic, maintaining curvature continuity (C2) along the entire
loop.

Controls whether the spline is created with fit points or with control vertices. (SPLMETHOD
system variable)
Creates a degree 3 (cubic) B-spline by specifying fit points that the spline must
pass through. When the tolerance value is greater than 0, the spline must be within
the specified tolerance distance from each point.
Creates a spline by specifying control vertices. Use this method to create splines
of degree 1 (linear), degree 2 (quadratic), degree 3 (cubic), and so on up to degree
۱۰. Adjusting the shape of a spline by moving control vertices often provides better
results than moving fit points.
Converts 2D or 3D quadratic or cubic spline-fit polylines to equivalent splines. The
original polyline is retained or discarded depending on the setting of the DELOBJ
system variable.
The following prompts are specific to the fit point method.
Specifies the knot parameterization, one of several computational methods that determines how the component curves between
successive fit points within a spline are blended. (SPLKNOTS system variable)

Specifies a tangent condition on the starting point of the spline.

Specifies a tangent condition on the ending point of the spline.

Specifies the distance by which the spline is allowed to deviate from the specified
fit points. A tolerance value of 0 requires the resulting spline to pass directly
through the fit points. The tolerance value applies to all fit points except the starting
and ending fit points, which always have a tolerance of 0.

The following prompt is specific to the control vertices (CV) method. (SPLMETHOD system
variable)
Sets the polynomial degree of the resulting spline. Use this option to create splines
of degree 1 (linear), degree 2 (quadratic), degree 3 (cubic), and so on up to degree
۱۰.
بنده سیامک دوستداری فارغ التحصیل رشته مکانیک سنگ از دانشگاه صنعتی اصفهان هستم، و در این وبسایت آموزش های مربوط به نحوه برنامه نویسی در اتوکد و هچنین آموزش تصویری دستورات اتوکد را قرار خواهم داد.
تلفن همراه: ۰۹۰۰۱۲۳۴۴۴۴
ایمیل: s.doostdari@gmail.com