Hatch-Creation-Ribbon-Contextual-Tab
Hatch Creation Ribbon Contextual Tab
List of Options
The following options are displayed.
Boundaries Panel
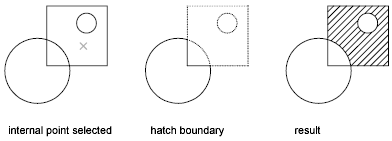
- Pick Points
-
Determines a hatch boundary by selecting a point within an enclosed area formed by
one or more objects.While specifying internal points, you can right-click in the drawing area at any time
to display a shortcut menu that contains several options.
- Select
-
Specifies a hatch boundary based on selected objects.
When you use this option, interior objects are not detected automatically. You must
select the objects within the selected boundary to hatch or fill those objects according
to the current island detection style.
In order to create an unhatched space around text, include the text in the selection
set.
While selecting objects, you can right-click at any time in the drawing area to display
a shortcut menu. You can undo the last selection or all selections, change the selection
method, change the island detection style, or preview the hatch or fill. - Remove
-
Removes from the boundary definition any of the objects that were previously added
. - Recreate
-
Creates a polyline or region around the selected hatch or fill, and optionally associates
the hatch object with it. - Display Boundary Objects
-
Selects the objects that form the boundaries of the selected associative hatch object.
Use the displayed grips to modify the hatch boundaries.NOTE: This option is available only when editing a hatch.When you select a non-associative hatch, the hatch boundary grips are displayed automatically.
When you select an associative hatch, a single hatch grip point is displayed unless
you select the Display Boundary Objects option. You can only edit an associative hatch
by grip-editing the associated boundary objects. - Retain Boundary Objects
-
Specifies how to handle hatch boundary objects. Options include
- Don’t Retain Boundaries. (Available only during hatch creation) Does not create a separate hatch boundary
object. - Retain Boundaries – Polyline. (Available only during hatch creation) Creates a polyline that encloses the hatch
object. - Retain Boundaries – Region. (Available only during hatch creation) Creates a region object that encloses the
hatch object. - Select New Boundary Set. Specifies a limited set of objects, called a boundary set, for evaluation by the
pick point when creating the hatch.
- Don’t Retain Boundaries. (Available only during hatch creation) Does not create a separate hatch boundary
Specify Boundary Set
Defines the set of objects analyzed when defining a boundary.
Pattern Panel
Displays preview images for all predefined and custom patterns.
You can find the custom patterns at the bottom of the pattern gallery on the Pattern
tab.
Properties Panel
- Hatch Type
-
Specifies whether to use a solid, a gradient, pattern, or user-defined fill.
The program provides the following predefined patterns:
- AutoCAD: acad.pat or acadiso.pat
- AutoCAD LT: acadlt.pat or acadltiso.pat
User-defined patterns are based on the current linetype in your drawing. A custom
pattern is a pattern that is defined in any custom PAT files that you have added to
the search path. - Hatch Color or Gradient Color 1
-
Overrides the current color for solid fills and hatch patterns, or specifies the first
of two gradient colors (HPCOLOR or GFCLR1). - Background Color or Gradient Color 2
-
Specifies the color for hatch pattern backgrounds, or the second gradient color. When
Hatch Type is set to Solid, Gradient Color 2 is not available. (HPBACKGROUNDCOLOR
or GFCLR2). - Hatch Transparency
-
Sets the transparency level for new hatches or fills, overriding the current object
transparency. Select Use Current to use the current object transparency setting (HPTRANSPARENCY). - Hatch Angle
-
Specifies an angle for the hatch or fill relative to the X axis of the current UCS. Valid values are from 0 to 359 (HPANG).
- Hatch Pattern Scale
-
(Available only when Type is set to Pattern) Expands or contracts a predefined or
custom hatch pattern (HPSCALE). - Hatch Spacing
-
(Available only when Hatch Type is set to User Defined) Specifies the spacing of lines
in a user-defined pattern (HPSPACE). - Gradient Tint and Shade On/Off
-
(Available only when Hatch Type is set to Gradient) Specifies whether a two-color
gradient is on or off. Clear the option to use two colors (GFCLRSTATE). - Gradient Tint and Shade
-
(Available only when Hatch Type is set to Gradient) When Hatch Type is set to Gradient,
this option specifies the tint (the selected color mixed with white) or the shade
(the selected color mixed with black) used for a one-color gradient fill (GFCLRLUM). - Layer Name
-
Assigns new hatch objects to the specified layer, overriding the current layer. Select
Use Current to use the current layer (HPLAYER). - Relative to Paper Space
-
(Available only in a layout) Scales the hatch pattern relative to paper space units.
Using this option, you can easily display hatch patterns at a scale that is appropriate
for your layout. - Double
-
(Available only when Hatch Type is set to User Defined) Draws a second set of lines
at 90 degrees to the original lines, creating a crosshatch (HPDOUBLE). - ISO Pen Width
-
(Available only for predefined ISO patterns) Scales an ISO pattern based on the selected
pen width.
Origin Panel
Controls the starting location of hatch pattern generation. Some hatches, such as
brick patterns, are meant to be aligned with a point on the hatch boundary. By default,
all hatch origins correspond to the current UCS origin.
- Set Origin
-
Specifies the new hatch origin point directly.
- Bottom Left
-
Sets the hatch origin at the bottom-left corner of the rectangular extents of the
hatch boundary. - Bottom Right
-
Sets the hatch origin at the bottom-right corner of the rectangular extents of the
hatch boundary. - Top Left
-
Sets the hatch origin at the top-left corner of the rectangular extents of the hatch
boundary. - Top Right
-
Sets the hatch origin at the top-right corner of the rectangular extents of the hatch
boundary. - Center
-
Sets the hatch origin at the center of the rectangular extents of the hatch boundary.
- Use Current Origin
-
Sets the hatch origin to the default location stored in the HPORIGIN system variable.
- Store as Default Origin
-
Stores the value of the new hatch origin in the HPORIGIN system variable.
Options Panel
Controls several commonly used hatch or fill options.
- Associative
-
Specifies that the hatch or fill is associative. A hatch or fill that is associative
is updated when you modify its boundary objects (HPASSOC). - Annotative
-
Specifies that the hatch is annotative. This property automates the process of scaling
annotations so that they plot or display at the correct size on the paper (HPANNOTATIVE). - Match Properties
- Gap Tolerance
-
Sets the maximum size of gaps that can be ignored when objects are used as a hatch
boundary. The default value, 0, specifies that the objects must enclose the area with
no gaps.Move the slider or enter a value, in drawing units, from 0 to 5000 to set the maximum
size of gaps that can be ignored when the objects serve as a hatch boundary. Any gaps
equal to or smaller than the value you specify are ignored, and the boundary is treated
as closed (HPGAPTOL). - Create Separate Hatches
-
Controls whether a single hatch object or multiple hatch objects are created when
several separate closed boundaries are specified. - Island Detection
-
- Normal Island Detection. Hatches or fills inward from the outer boundary. If an internal island is encountered,
hatching or filling is turned off until another island within the island is encountered
(HPISLANDDETECTION) . - Outer Island Detection. Hatches or fills inward from the outer boundary. This option hatches or fills only
the specified area and leaves the internal islands unaffected (HPISLANDDETECTION). - Ignore Island Detection. Ignores all internal objects and hatches or fills through them (HPISLANDDETECTION).
- Normal Island Detection. Hatches or fills inward from the outer boundary. If an internal island is encountered,
- Draw Order
-
Assigns a draw order to a hatch or fill (HPDRAWORDER). Options include
- Do Not Change
- Send to Back
- Bring to Front
- Send Behind Boundary
- Bring in Front of Boundary
Close Panel
- Close Hatch Creation
-
Exits HATCH and closes the contextual tab.
You can also press Enter or Esc to exit HATCH.
Related References
Related Concepts
st of Options The following options are displayed. Boundaries Panel Pick Points Determines a hatch boundary by selecting a point within an enclosed area …Hatch Editor Ribbon Contextual Tab. In-Product View … (Available only during hatch creation) Creates a region object that encloses the hatch object. Select New …hatch and fills. List of Options The following options are displayed.… In AutoCAD 2011, Autodesk introduce contextual ribbon tab in AutoCAD for hatch creation and editing. Personally I think that is a good feature, …… The hatch ribbon has become the "norm" for the last couple of releases of … Tip: a “Contextual Ribbon” is a ribbon tab that appears only when a …… Do not switch to contextual tab on selection: Turn this feature off and do not change the Ribbon Automatically (If this is driving you crazy this is …hatching to represent the type of material that makes up an … The Hatch Creation contextual tab on the Ribbon appears.creation using the hatch command … down list, at the left of the context sensitive “Hatch Creation” ribbon tab, as shown in Figure 1.
