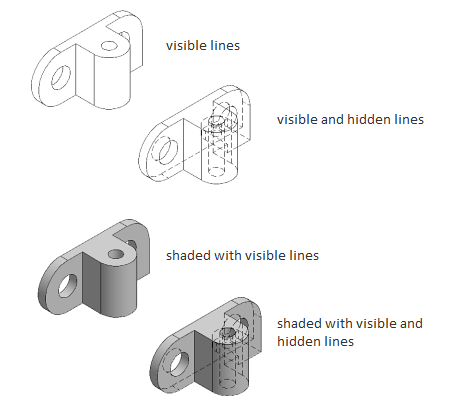
Changes the properties of the selected drawing view object.
The following options are displayed.
This panel is visible only when you are editing a view created from an Inventor model.
The options you can view and edit depend on the properties of the selected model.
You can only edit the values for Design View.
Specifies the weldment state to show in the selected view. The list does not explicitly
show the preparatory state. Instead, it displays the names of the components in the
pre-welding preparatory state.
This option is available only if the selected view is created from an Inventor weldment
assembly (*.iam).
Specifies which member from an iAssembly factory or iPart factory to show in the base
view.
This option is available only if the selected view is created from an iAssembly factory
or an iPart factory (*.iam, *.ipt).
Specifies the sheet metal view to show in the selected view.
This option is available only if the selected view is created from an Inventor sheet
metal file (*.ipt).
Specifies the presentation view to show in the base view.
This option is available only the selected view is created from an Inventor Presentation
document (*.ipn).
Specifies the display style to use for the selected view.

Specifies the absolute scale to use for the selected view. You can select a standard
scale from the drop-down list, or directly enter a non-standard scale.
Displays a list of objects to show in the selected view.
Specifies if the drawing view inherits the section cut from the parent view, when
the parent view is a section view. This option is available only when editing drawing
views derived from a section view.
Displays the View Options dialog box. This dialog box specifies how to anchor the
selected view, and how to display Inventor Reference Parts.
Saves changes and closes the Drawing View Creation Ribbon Contextual Tab.
Cancels the most recent edit and closes the Drawing View Creation Ribbon Contextual
Tab. If Defer Updates in on, cancels the entire editing session.
Prevents the selected drawing view from reacting to a property change until you click
OK or turn off Defer Updates. This option is typically used for drawing views of large
models, where applying each property change in real time may take time.
anges the properties of the selected drawing view object. List of Options The following options are displayed. Model Space Selection Find This option is …view. Clicking on the hatch brings up the Drawing View Hatch Editor Contextual Ribbon Tab, where you …view from model space or Autodesk Inventor models. … This panel is visible only when you create a base view from an Inventor model. … This option is available only if the selected model is an Inventor assembly (*.iam) that contains design view representations.edit the values for Design View. Appearance Panel Hidden Lines Specifies … Section View Creation Ribbon Contextual Tab. In-Product View Help.drawing units for new text or changes the height of selected text. … View Original X …. Close Text Editor, Ends the MTEXT command and closes the Text Editor ribbon contextual tab.view and edit depend on the properties of the selected model. … the hatch brings up the Drawing View Hatch Editor Contextual Ribbon Tab, …contextual ribbon tab is displayed. … 2015, AutoCAD Utility Design 2016, & AutoCAD Utility Design 2017. See More.view, no contextual tab apears, even after I click "Edit View" in the Layout Tab with a base view …editing a detail view created from an … a detailed view of a portion of an existing model documentation drawing view. … Saves the changes and exits the Detail View Creation ribbon contextual tab.
بنده سیامک دوستداری فارغ التحصیل رشته مکانیک سنگ از دانشگاه صنعتی اصفهان هستم، و در این وبسایت آموزش های مربوط به نحوه برنامه نویسی در اتوکد و هچنین آموزش تصویری دستورات اتوکد را قرار خواهم داد.
تلفن همراه: ۰۹۰۰۱۲۳۴۴۴۴
ایمیل: s.doostdari@gmail.com