مشی ایجاد می کند که سطح بین دو خط یا منحنی را نشان می دهد.
دو لبه را انتخاب کنید که مش را مشخص می کند. لبه ها می توانند خطوط ، قوس ها ، اسپلین ها ، دایره ها یا پلی اتیلن ها باشند. اگر یکی از لبه ها بسته باشد ، باید لبه دیگر نیز بسته شود. همچنین می توانید از یک نقطه به عنوان یک لبه برای یک منحنی باز یا بسته استفاده کنید.
متغیر سیستم MESHTYPE مجموعه ای از نوع مش ایجاد می کند. اشیاء مش به طور پیش فرض ایجاد می شوند. متغیر را بر روی ۰ تنظیم کنید تا میراث چند سطحی یا مش چند ضلعی ایجاد شود. برای منحنی های بسته ، انتخاب اهمیتی ندارد. اگر منحنی یک دایره باشد ،مشی حاکم در نقطه چهار درجه ۰ درجه شروع می شود ، همانطور که با محور X فعلی به اضافه مقدار فعلی متغیر سیستم SNAPANG تعیین می شود. برای پلی اتیلن های بسته ، مش حاکم از آخرین راس شروع می شود و در امتداد بخش های پلی لاین به عقب می رود . ایجاد مش مشروط بین دایره و یک پلی لاین بسته می تواند گیج کننده باشد. تعویض پلی لاین نیم دایره ای بسته برای دایره ممکن است ارجح باشد.
مش حاکم به عنوان یک مش چند ضلعی N ۲ ساخته شده است . RULESURF نیمی از راس مش را در فواصل برابر در امتداد یک منحنی تعیین کننده قرار می دهد ، و نیمی دیگر در فواصل برابر در امتداد منحنی دیگر. تعداد فواصل توسط متغیر سیستم SURFTAB1 مشخص شده است. برای هر منحنی یکسان است. بنابراین ، فاصله بین راسها در امتداد دو منحنی متفاوت است اگر منحنی ها طول های مختلفی داشته باشند.
N جهت مش است که در امتداد منحنی مرز. اگر هر دو مرز بسته باشد ، یا اگر یکی بسته باشد و دیگری نقطه باشد ، مش چند ضلعی حاصل از جهت N بسته شده و N برابر است با SURFTAB1. اگر هر دو طرف مرز باز هستند، N برابر SURFTAB1 + 1، زیرا که تقسیم یک منحنی به N قسمت نیاز به N + ۱ جدول نمایند.
۰/۰ راس مش مشبک انتهای اولین منحنی انتخابی نزدیکترین نقطه ای است که برای انتخاب آن منحنی استفاده کرده اید. انتخاب اشیاء در همان انتهای ، مش چند ضلعی ایجاد می کند.
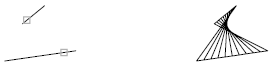
انتخاب اشیاء در انتهای مخالف ، مش چند ضلعی خود تلاقی ایجاد می کند.
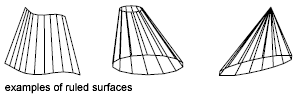
Creates a mesh that represents the surface between two lines or curves.
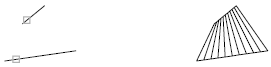
Select two edges that define the mesh. The edges can be lines, arcs, splines, circles,
or polylines. If one of the edges is closed, then the other edge must also be closed.
You can also use a point as one edge for either an open or a closed curve.
The MESHTYPE system variable sets which type of mesh is created. Mesh objects are
created by default. Set the variable to 0 to create legacy polyface or polygon mesh.
For closed curves, the selection does not matter. If the curve is a circle, the ruled
mesh begins at the 0-degree quadrant point, as determined by the current X axis plus the current value of the SNAPANG system variable. For closed polylines,
the ruled mesh starts at the last vertex and proceeds backward along the segments
of the polyline. Creating a ruled mesh between a circle and a closed polyline can
be confusing. Substituting a closed semicircular polyline for the circle might be
preferable.
The ruled mesh is constructed as a 2 by N polygon mesh. RULESURF places half the mesh vertices at equal intervals along one
defining curve, and the other half at equal intervals along the other curve. The number
of intervals is specified by the SURFTAB1 system variable. It is the same for each
curve; therefore, the distance between the vertices along the two curves differs if
the curves are of different lengths.
The N direction of the mesh is along the boundary curves. If both boundaries are closed,
or if one is closed and the other is a point, the resulting polygon mesh is closed
in the N direction and N equals SURFTAB1. If both boundaries are open, N equals SURFTAB1 + 1, because division of a curve into n parts requires n + ۱ tabulations.
The 0,0 vertex of the mesh is the endpoint of the first selected curve nearest the
point you used to select that curve.
Selecting objects at the same ends creates a polygon mesh.
Selecting objects at opposite ends creates a self-intersecting polygon mesh.