یک رایانه لوحی دیجیتالیزه شده پیوست ، کالیبره ، پیکربندی شده و روشن و خاموش می شود.
با اجرای دستور گزینه های زیر نمایش داده می شود.
حالت تبلت را روشن می کند. تنظیم متغیر سیستم TABMODE در ۱ نیز حالت Tablet را روشن می کند.
حالت قرص را خاموش می کند. تنظیم متغیر سیستم TABMODE در ۰ حالت تبلت را نیز خاموش می کند .
دیجیتایزر را با یک نقشه یا عکس کاغذ کالیبره می کند ، و ایجاد تبلت را ایجاد می کند ، که نقشه برداری از نقاط از رایانه لوحی به سیستم ترسیم مختصات است. کالیبراسیون در حال دیجیتالی کردن نقاط روی نقشه و نقشه برداری از آنها در مختصات واقعی آنها است. کالیبراسیون می تواند در فضای مدل یا فضای کاغذ انجام شود. گزینه Cal حالت تبلت را در فضایی که کالیبراسیون تبلت در آن قرار دارد ، روشن می کند. با تغییر فضا ، گزینه Cal حالت Tablet را خاموش می کند. کاغذ باید صاف (بدون برآمدگی یا چروک) باشد و به طور ایمن به قرص دیجیتالی چسبانده شود . مقاله را می توان از هر زاویه ای جهت گیری کرد.
نکاتی که وارد می کنید نمی توانند تکراری باشند. لازم نیست امتیازها در هر یک از محورها منشاء باشند و شما می توانید نقاط زیادی را که دوست دارید وارد کنید. هرچه امتیاز بیشتری وارد کنید ، نقاشی دقیق تر خواهد بود. اگر فقط دو نکته را وارد کنید ، برنامه به طور خودکار یک تحول متعامد را محاسبه می کند. اگر سه یا چند امتیاز وارد کنید ، برنامه تحول را در هر سه نوع تبدیل (Orthogonal ، Affine و Projective) محاسبه می کند تا مشخص شود که بهترین نقاط نقاط کالیبراسیون را دارد. اگر بیش از چهار امتیاز را وارد کنید ، محاسبه تحول پیش بینی کننده مناسب ترین می تواند مدت زمان طولانی طول بکشد.
با فشار دادن Esc می توانید این روند را لغو کنید .
پس از اتمام محاسبات ، برنامه یک جدول با تعداد نقاط کالیبراسیون و یک ستون برای هر نوع تبدیل نشان می دهد. اگر هیچ مشکلی در تغییر پروژکتور به وجود نیامده است ، این برنامه از شما می خواهد که یک نوع تبدیل را انتخاب کنید.
فقط انواع تحول که نتیجه آن موفقیت ، دقیق یا لغو شده است در این بیانیه گنجانده شده است. حتی اگر لغو شود ، می توان یک تحول پیش بینی را مشخص کرد . این برنامه از نتیجه محاسبه شده در زمان لغو استفاده استفاده می کند.
ترجمه ، پوسته پوسته شدن یکنواخت و چرخش را با دو نقطه کالیبراسیون مشخص می کند. از نقشه های Orthogonal برای نقشه های دقیق ابعادی کاغذ و نقشه های کاغذ استفاده کنید که در آن بخشی که باید دیجیتالی شود طولانی و باریک است و بیشتر نقاط آن محدود به خطوط منفرد است.
تحول خطی دلخواه را در دو بعد شامل ترجمه ، مستقل X – و Y- اندازه گیری ، چرخش و چرخش با سه نقطه کالیبراسیون مشخص می کند. از Affine استفاده کنید که ابعاد افقی در یک نقشه کاغذ با توجه به ابعاد عمودی کشیده شود و خطوطی که قرار است موازی باشند در واقع موازی هستند. خطای RMS (root میانگین مربع) گزارش شده پس از کالیبراسیون ، نشان می دهد که چقدر برنامه برای دستیابی مناسب به برنامه نزدیک است. در صورت کوچک بودن RMS باید از Affine استفاده شود.
یک تحول معادل پیش بینی چشم انداز یک هواپیما در فضا بر روی هواپیمای دیگر با چهار نقطه کالیبراسیون را مشخص می کند. تحول پروژکتیکی شکل محدودی از آنچه نقشه برداران به آن ورق لاستیکی می نامند ، فراهم می کند که در آن قسمت های مختلف سطح تبلت با مقادیر مختلف کشیده می شود. نقشه های خطوط مستقیم به خطوط مستقیم. خطوط موازی لزوماً موازی نیستند. تحولات پروژه ای خطوط موازی را که به نظر می رسد همگرا هستند تصحیح می کند.
جدول محاسبه شده را بازنویسی می کند ، که انواع تحول را ارزیابی می کند.
تعداد نقاط کالیبراسیون را گزارش می کند و اطلاعات مربوط به هر نوع تبدیل را ارائه می دهد .
نتیجه مناسب برای هر یک از انواع تحول را گزارش می کند. اگر نتیجه تناسب برای هر یک از انواع تحول موفقیت آمیز یا دقیق نباشد ، برنامه از کار افتادن کل فرآیند کالیبراسیون خبر داده و دستور را به پایان می رساند. نوشته های باقی مانده در هر ستون خالی است مگر اینکه نتیجه Fit Success باشد.
تعداد صحیح امتیاز برای یک تحول معتبر را نشان می دهد.
بیش از امتیاز کافی را نشان می دهد. این برنامه موفق شد متناسب با داده ها را تغییر دهد.
نقاط کافی را نشان نمی دهد.
نقاط کافی را نشان می دهد ، اما برنامه قادر به تغییر در نقاط نبود ، معمولاً به این دلیل که بعضی از نقاط به صورت همزمان و همزمان بودند.
نشان می دهد که روند مناسب لغو شده است. این نتیجه فقط با تحول پروژکتور رخ می دهد .
خطای RMS (root میانگین مربع) را گزارش می کند ، که اندازه گیری نزدیک بودن برنامه برای یافتن یک مناسب کامل را نشان می دهد. هدف کوچکترین خطای RMS است.
انحراف استاندارد باقیمانده را گزارش می کند. اگر نزدیک صفر باشد ، باقیمانده در هر نقطه کالیبراسیون تقریباً یکسان است.
نقطه ای را گزارش می کند که در آن نقشه برداری دقیق تر است. باقیمانده فاصله بین مکانی است که در هنگام تحول از نقشه نقشه گرفته شده است
و در صورت کامل بودن نقشه ، از آنجا نقشه برداری می شود . فاصله در واحدهای خطی فعلی داده شده است.
نقطه ای را گزارش می کند که در آن نقشه نویسی از نظر دقیق بسیار کم است. باقیمانده فاصله بین مکانی است که در هنگام تحول از نقشه نقشه برداری شده است و در صورت کامل بودن نقشه ، از آنجا نقشه برداری می شود. فاصله در واحدهای خطی فعلی داده شده است.
مناطق منوی رایانه لوحی را مشخص یا مجدداً تنظیم می کند یا بخش کوچکی از رایانه لوحی بزرگ را به عنوان ناحیه نشانگر صفحه تعیین می کند. در صورت استفاده از منوهای رایانه لوحی و تعداد منوها به همان تعداد انتخاب شده ، گزینه های زیر نمایش داده می شود:
در سریع ، n شماره منو (۱-۴) است. فرم منوی چاپی باید روی سطح رایانه لوحی درج شود و نقاط درخواستی دیجیتالی شوند. مجموعه سه نقطه باید زاویه ۹۰ درجه تشکیل دهد. مناطق منوی قرص را می توان در هر زاویه ای چسبانید. پس از اتمام تمام تعامل در مورد منوهای تبلت ، اعلان زیر نمایش داده می شود:
اگر y را وارد کنید ، پیام های زیر نمایش داده می شوند:
بخش کوچکی از سطح تبلت به عنوان ناحیه نشانگر صفحه ثابت تعیین می شود .
اگر شما پاسخ Y به قبلی سریع، به فرمان های زیر است:
اگر شما پاسخ N به قبلی سریع، پاسخ به دهید زیر است:
به فوریت زیر پاسخ دهید:
اگر شما پاسخ Y به قبلی سریع، به فرمان های زیر است:
Calibrates, configures, and turns on and off an attached digitizing tablet.
The following options are displayed.
Turns on Tablet mode. Setting the TABMODE system variable to 1 also turns on Tablet
mode.
Turns off Tablet mode. Setting the TABMODE system variable to 0 also turns off Tablet
mode.
Calibrates the digitizer with a paper drawing or photograph, creating the tablet transformation,
which is the mapping of points from the tablet to the coordinate drawing system. Calibration
is digitizing points on the drawing and mapping them to their real coordinates.
Calibration can be performed in model space or paper space. The Cal option turns on
Tablet mode in the space in which the tablet is calibrated. When the space is changed,
the Cal option turns off Tablet mode.
The paper should be flat (with no bumps or wrinkles) and securely fastened to the
digitizing tablet. The paper can be oriented at any angle.
The points you enter cannot be duplicates. The points need not be the origin on either
axis, and you can enter as many points as you like. The more points you enter, the
more accurate the drawing will be.
If you enter only two points, the program automatically computes an orthogonal transformation.
If you enter three or more points, the program computes the transformation in each
of the three transformation types (Orthogonal, Affine, and Projective) to determine
which best fits the calibration points. If you enter more than four points, computing
the best-fitting projective transformation can take a long time. You can cancel the
process by pressing Esc.
When the computations are complete, the program displays a table with the number of
calibration points and a column for each transformation type.
If there have been no failures of projection transformation, the program prompts you
to choose a transformation type.
Only transformation types for which the outcome was Success, Exact, or Canceled are
included in this prompt. A projective transformation can be specified even if it was
canceled. The program uses the result computed at the time you canceled.
Specifies translation, uniform scaling, and rotation with two calibration points.
Use Orthogonal for dimensionally accurate paper drawings and paper drawings in which
the portion to be digitized is long and narrow, with most points confined to single
lines.
Specifies arbitrary linear transformation in two dimensions consisting of translation,
independent X– and Y-scaling, rotation, and skewing with three calibration points.
Use Affine when horizontal dimensions in a paper drawing are stretched with respect
to vertical dimensions, and lines that are supposed to be parallel actually are parallel.
The RMS (root mean square) error reported after calibration measures how close the
program has come to making a perfect fit. Affine should be used if the RMS is small.
Specifies a transformation equivalent to a perspective projection of one plane in
space onto another plane with four calibration points. A projective transformation
provides a limited form of what cartographers call rubber sheeting, in which different portions of the tablet surface are stretched by varying amounts.
Straight lines map into straight lines. Parallel lines do not necessarily stay parallel.
Projective transformation corrects parallel lines that appear to converge.
Redisplays the computed table, which rates the transformation types.
Reports the number of calibration points and provides information about each transformation
type.
Reports the outcome of fit for each of the transformation types. If the outcome of
fit is not Success or Exact for any of the transformation types, the program reports
failure of the entire calibration process and ends the command. The remaining entries
in each column are blank unless Outcome of Fit is Success.
Indicates the correct number of points for a valid transformation.
Indicates more than enough points. The program succeeded in fitting a transformation
to the data.
Indicates not enough points.
Indicates enough points, but the program was unable to fit a transformation to the
points, usually because some points were colinear or coincident.
Indicates that the fit process was canceled. This outcome occurs only with the projective
transformation.
Reports the RMS (root mean square) error, which measures how close the program has
come to finding a perfect fit. The goal is the smallest RMS error.
Reports the standard deviation of the residuals. If it is near zero, the residual
at each calibration point is about the same.
Reports the point at which the mapping is least accurate. The residual is the distance
between where the point was mapped during transformation and where it would be mapped
if the fit were perfect. The distance is given in the current linear units.
Reports the point at which the mapping is second-least accurate. The residual is the
distance between where the point was mapped during transformation and where it would
be mapped if the fit were perfect. The distance is given in the current linear units.
Designates or realigns the tablet menu areas or designates a small portion of a large
tablet as a screen pointing area.
If tablet menus are in use and the same number of menus is selected, the following
prompts are displayed:
In the prompt, n is the menu number (1-4).
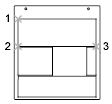
The printed menu form must be affixed to the tablet surface, and the requested points
must be digitized. The set of three points must form a 90-degree angle. Tablet menu
areas can be skewed at any angle.
After all interaction concerning tablet menus is complete, the following prompt is
displayed:
If you enter y, the following prompts are displayed:
A small portion of the tablet’s surface is designated as the fixed screen pointing
area.
If you responded y to the previous prompt, respond to the following prompt:
If you responded n to the previous prompt, respond to the following prompts:
Respond to the following prompt:
If you responded y to the previous prompt, respond to the following prompt: