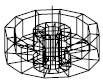
با چرخاندن نمایه در مورد یک محور ، مش را ایجاد می کند.
یک خط ، قوس ، دایره یا چند خط ۲D یا ۳D را انتخاب کنید تا در یک مسیر دایره ای در اطراف یک محور انتخابی حرکت کنید.
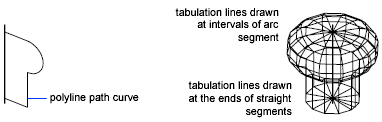
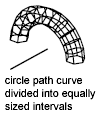
متغیر سیستم MESHTYPE مجموعه ای از نوع مش ایجاد می کند. اشیاء مش به طور پیش فرض ایجاد می شوند. متغیر را بر روی ۰ تنظیم کنید تا میراث چند سطحی یا مش چند ضلعی ایجاد شود. چگالی مش تولیدی توسط متغیرهای سیستم SURFTAB1 و SURFTAB2 کنترل می شود . SURFTAB1 تعداد خطوط جدول بندی را که در جهت انقلاب کشیده شده است ، مشخص می کند. اگر منحنی مسیر یک خط ، قوس ، دایره یا پلی لاین متناسب با اسپلین باشد ، SURFTAB2 تعداد خطوط جدول بندی را که برای تقسیم آن در فواصل مساوی تقسیم شده است ، مشخص می کند. اگر منحنی مسیر چند خطی باشد که متناسب با اسپلین نبوده است ، خطوط جدول بندی در انتهای بخشهای مستقیم کشیده شده و هر بخش قوس به تعداد فواصل مشخص شده توسط SURFTAB2 تقسیم می شود.
با اجرای دستور پیام های زیر نمایش داده می شود.
چگالی قاب سیم فعلی: SURFTAB1 = جریان SURFTAB2 = جریان
یک خط ، قوس ، دایره یا چند خط ۲D یا ۳D را انتخاب کنید.
یک خط را انتخاب کنید یا پلی لاین ۲D یا ۳D را باز کنید. جهت محور نمی تواند موازی با صفحه اصلی جسم باشد.
منحنی مسیر برای محور انتخاب شده جابجا می شود تا مش را تعریف کند. منحنی مسیر جهت N را از مش تعریف می کند . انتخاب یک دایره یا یک پلی لاین بسته به عنوان منحنی مسیر مش را در جهت N می بندد .
بردار از اولین تا آخرین راس پلی لاین محور چرخش را تعیین می کند. هر راس میانی نادیده گرفته می شود. محور انقلاب جهت M مش را تعیین می کند.
اگر روی یک مقدار غیرزرو تنظیم شود ، مش از انقلاب را با جبران از منحنی مسیر تولید شروع کنید . مشخص کردن زاویه شروع ، مشبک انقلاب را با جبران از منحنی مسیر تولید شروع می کند.
مشخص می کند که تا چه حد در مورد محور انقلاب مش گسترش می یابد. زاویه گنجانده شده مسافتی است که از طریق آن منحنی مسیر جابجا می شود. وارد کردن زاویه شامل کمتر از یک دایره کامل مانع از بسته شدن دایره می شود .
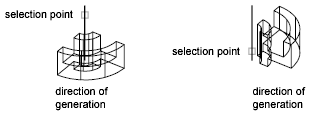
نکته ای که شما برای انتخاب محور انقلاب استفاده می کنید بر جهت انقلاب تأثیر می گذارد. مش در مثال زیر با مشخص کردن زاویه شروع ۰ درجه و زاویه شامل ۹۰ درجه ایجاد شده است.
Creates a mesh by revolving a profile about an axis.
Select a line, arc, circle, or 2D or 3D polyline to sweep in a circular path around
a selected axis.
The MESHTYPE system variable sets which type of mesh is created. Mesh objects are
created by default. Set the variable to 0 to create legacy polyface or polygon mesh.
The density of the generated mesh is controlled by the SURFTAB1 and SURFTAB2 system
variables. SURFTAB1 specifies the number of tabulation lines that are drawn in the
direction of revolution. If the path curve is a line, arc, circle, or spline-fit polyline,
SURFTAB2 specifies the number of tabulation lines that are drawn to divide it into
equal-sized intervals. If the path curve is a polyline that has not been spline fit,
tabulation lines are drawn at the ends of straight segments, and each arc segment
is divided into the number of intervals specified by SURFTAB2.
The following prompts are displayed.
Current wire frame density: SURFTAB1=current SURFTAB2=current
Select a line, arc, circle, or 2D or 3D polyline.
Select a line or open 2D or 3D polyline. The axis direction cannot be parallel to
the plane of the original object.
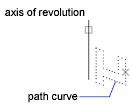
The path curve is swept about the selected axis to define the mesh. The path curve
defines the N direction of the mesh. Selecting a circle or a closed polyline as the path curve
closes the mesh in the N direction.
The vector from the first to the last vertex of the polyline determines the rotation
axis. Any intermediate vertices are ignored. The axis of revolution determines the
M direction of the mesh.
If set to a nonzero value, starts the mesh of revolution at an offset from the generating
path curve.
Specifying a start angle starts the mesh of revolution at an offset from the generating
path curve.
Specifies how far about the axis of revolution the mesh extends. The included angle
is the distance through which the path curve is swept.
Entering an included angle that is less than a full circle prevents the circle from
closing.
The point you use to select the axis of revolution affects the direction of revolution.
The mesh in the following example was created by specifying a start angle of 0 degrees
and an included angle of 90 degrees.