You can assign properties such as color and linetype to individual objects, or as
default properties assigned to layers.
In the following drawing, the walls, exterior stone facing, doors, fixtures, cabinetry,
HVAC, electrical, and text were created using different colors to help differentiate
between them.

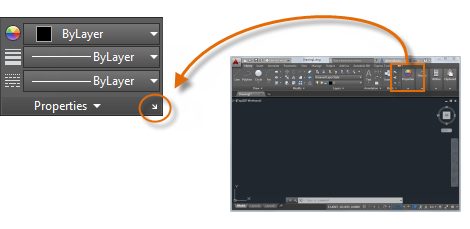
The Properties palette is an essential tool. You can open it with the PROPERTIES command
(enter PR in the Command window), you can press Ctrl + 1, or you can click the tiny
arrow in the Properties panel on the Home tab—whichever you prefer.
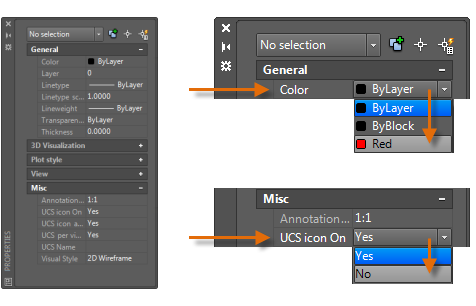
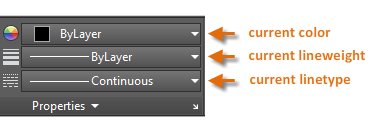
The Properties palette displays a list of all the important property settings. You
can click any of the available fields to change the current settings. In the following
example, if no objects are selected, the current color will be changed from ByLayer
to Red and the UCS icon will be turned off.
You can use the Properties palette to verify and change property settings for selected
objects. If you click an object in your drawing to select it, here is what you might
see in the Properties palette.
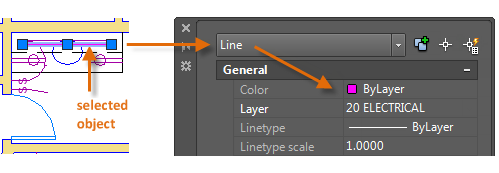
Notice that the current properties for the selected object are displayed in the palette.
You can change any of these properties by clicking and changing the setting.
A property that is set to “ByLayer” inherits its setting from the layer. In the previous
example, the objects that were created on the 20 ELECTRICAL layer are purple because
that is the default color of the objects on that layer.
If you select several objects, only their common properties are listed in the Properties
palette. If you change one of these properties, all the selected objects will change
in one operation. Selecting objects is covered in more detail in the Modifying topic.
The Properties palette takes up a lot of space. For quick access to the most common
properties, use the Properties panel. As you can see in this example, the listed properties
will all be determined by the current layer.
The Properties panel works the same way as the Properties palette. When you select
an object, the current property settings are replaced by the properties assigned to
the selected object, and you can use this panel to easily change the properties of
one of more selected objects.
For a fast way to copy the properties of a selected object to other objects, use the
Match Properties tool, or enter MATCHPROP or MA in the Command window.
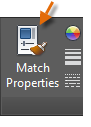
Select the source object, and then select all of the objects that you want to modify.
Dashed and other non-continuous linetypes are assigned from the Properties panel.
You must first load a linetype before you can assign it.
In the Linetype drop-down list, click Other.
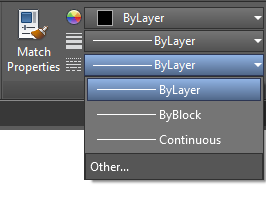
This action displays the Linetype Manager dialog box.
Perform the following steps in order:
Once you’ve loaded the linetypes that you plan to use, you can select any object and
specify a linetype from the Properties panel or the Properties palette. Alternatively,
you can specify a default linetype for any layer in the Layer Properties Manager.
The Lineweight property provides a way to display different thicknesses for selected
objects. The thickness of the lines remain constant regardless of the scale of the
view. In a layout, lineweights are always displayed and printed in real-world units.
Lineweights can also be assigned from the Properties panel.
You can leave the lineweight set to ByLayer, or you can specify a value that overrides
the layer’s lineweight. In some cases, the lineweight previews look the same because
they are displayed in approximated pixel widths on a monitor. However, they will print
at the correct thickness.
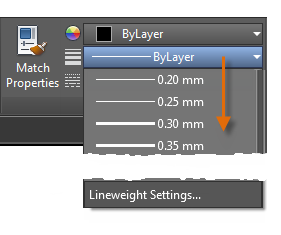
To control the display of lineweights, click the Lineweight Settings button at the
bottom of the lineweight list. In the Lineweight Settings dialog box, you can choose
whether you want to display or hide lineweights.
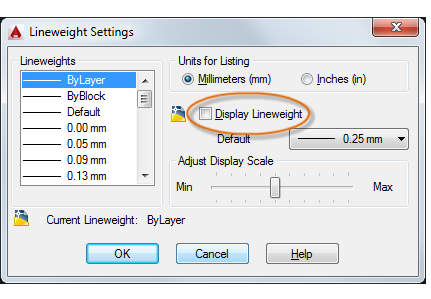
Regardless of the display setting, lineweights will always be printed at the correct
scale.
spicago Real Estate listings from Chicago's #1 Real Estate Brokerage Firm. @ properties is dedicated to bringing you updated real estate information so you …properties. English (US) · Español · Português (Brasil) · Français (France) · Deutsch.properties have been attached after the department issued a provisional order under the Benami Transactions Act, 1988, …property is one or more components (rather than attributes), whether physical or incorporeal, of a person's estate; or so belonging to, as in being owned by, a person or jointly a group of people or a legal entity like a corporation or even a society.Properties class represents a persistent set of properties. The Properties can be saved to a stream or loaded from a stream. Each key and its corresponding …properties at Thesaurus.com with free online thesaurus, antonyms, and definitions. Dictionary and Word of the Day.property: something that is owned by a person, business, etc. — property in a sentence.properties, as well as specialized spaces for multifamily, …